
Minimalist Recording Studio

This post is about a DIY minimalist digital music station that I designed and built. Feel free to use this post as a step by step guide to building one for yourself, or take inspiration from this to build something entirely different.
Space Is a Premium
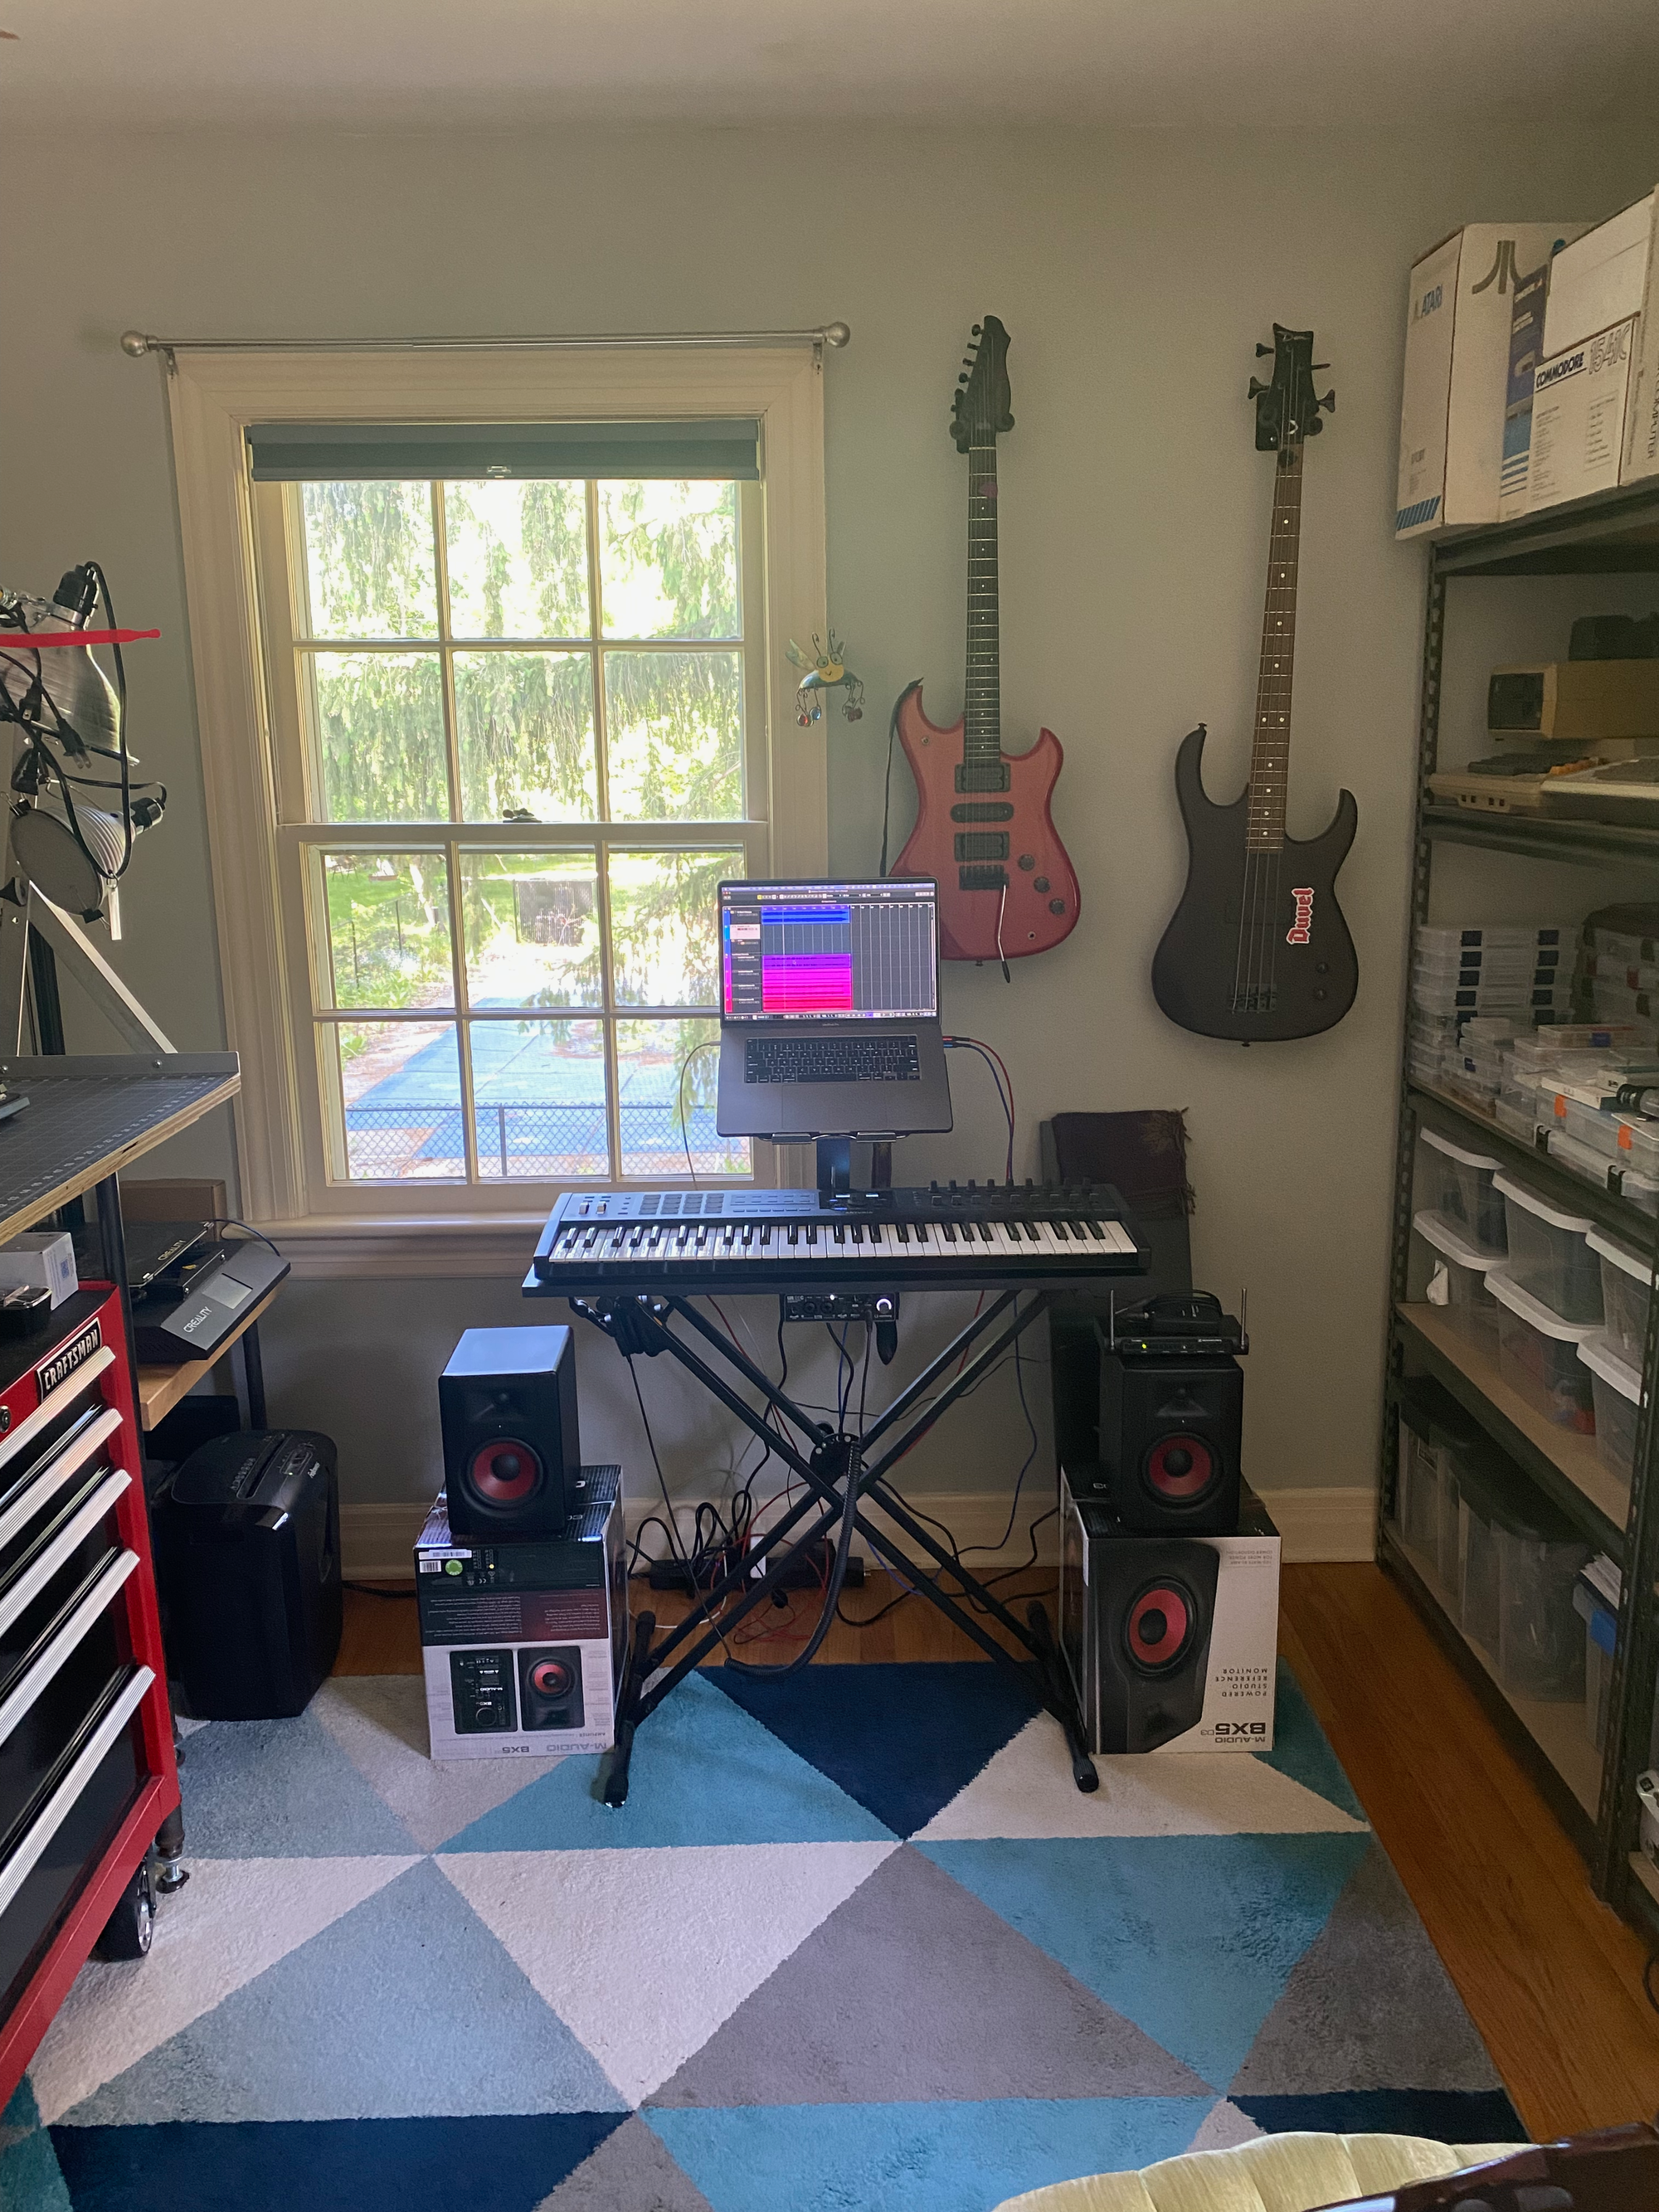
I have commandeered one of the bedrooms in our home to be my office/electronics lab/3D printing/tinkering space/music room. The bedrooms in our home are somewhat small by today's standards (our house was built in the early 1940's), and the room that I use measures roughly 10 ft x 11 ft with a small closet, one entry door, and two windows.
Fitting a fairly sizable DIY standing desk, 3D printer, two shelving units, a roll-away tool chest, several guitars, and still having some space to dedicate to learning, practicing, and recording music is a bit of a challenge.
Setting Up My Creative Space For Music Again
Once I had most of my creative space organized in such a way that I could easily switch between my work and my tinkering & retro-computing hobbies, I now had room for my guitars. It wasn't long after I had my electric guitar and my bass guitar hanging on the wall, and my twelve string acoustic on a floor stand, that my thoughts immediately went to how I could resurrect my digital recording setup.
As mentioned earlier, space is limited, and I didn't want to stifle my creativity by clutter or by trying to cram too many things into a small space. At the same time, I also wanted to be able to do something with music whenever inspiration comes without a lot of setup and break down time and effort. Ideally, the setup should be semi-permanent and take up very little space.
Repurpose: Use What You Have Whenever Possible
I had watched several very impressive YouTube videos on DIY recording work stations/desks for inspiration, and although that would have been nice, it didn't meet my criteria listed earlier. Another issue with building a more permanent studio console is the cost of building materials in the post-Covid world we live in. Lastly, I always try to utilize things that I already have rather than just going out and purchasing another thing whenever possible.
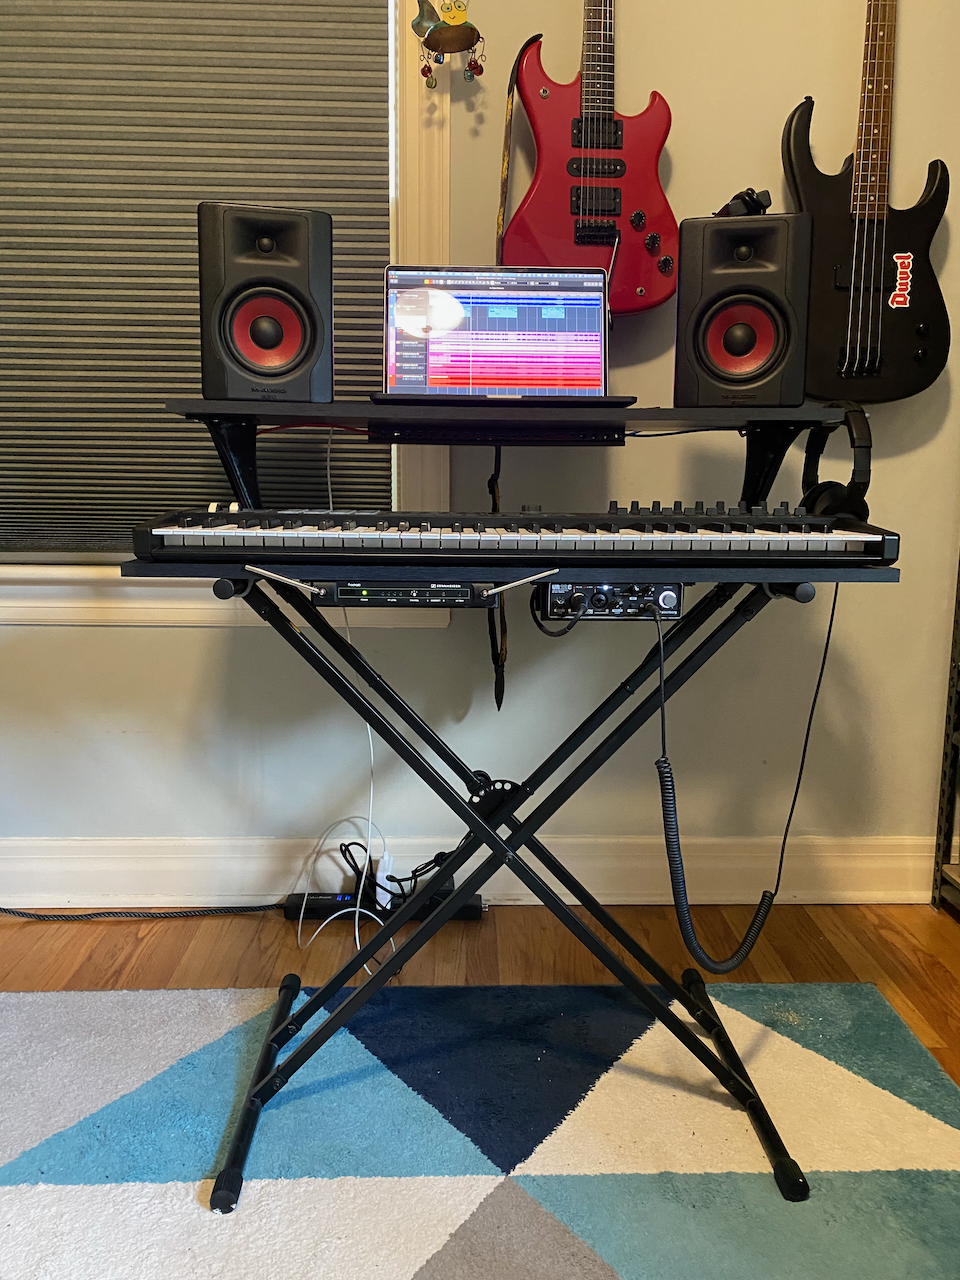
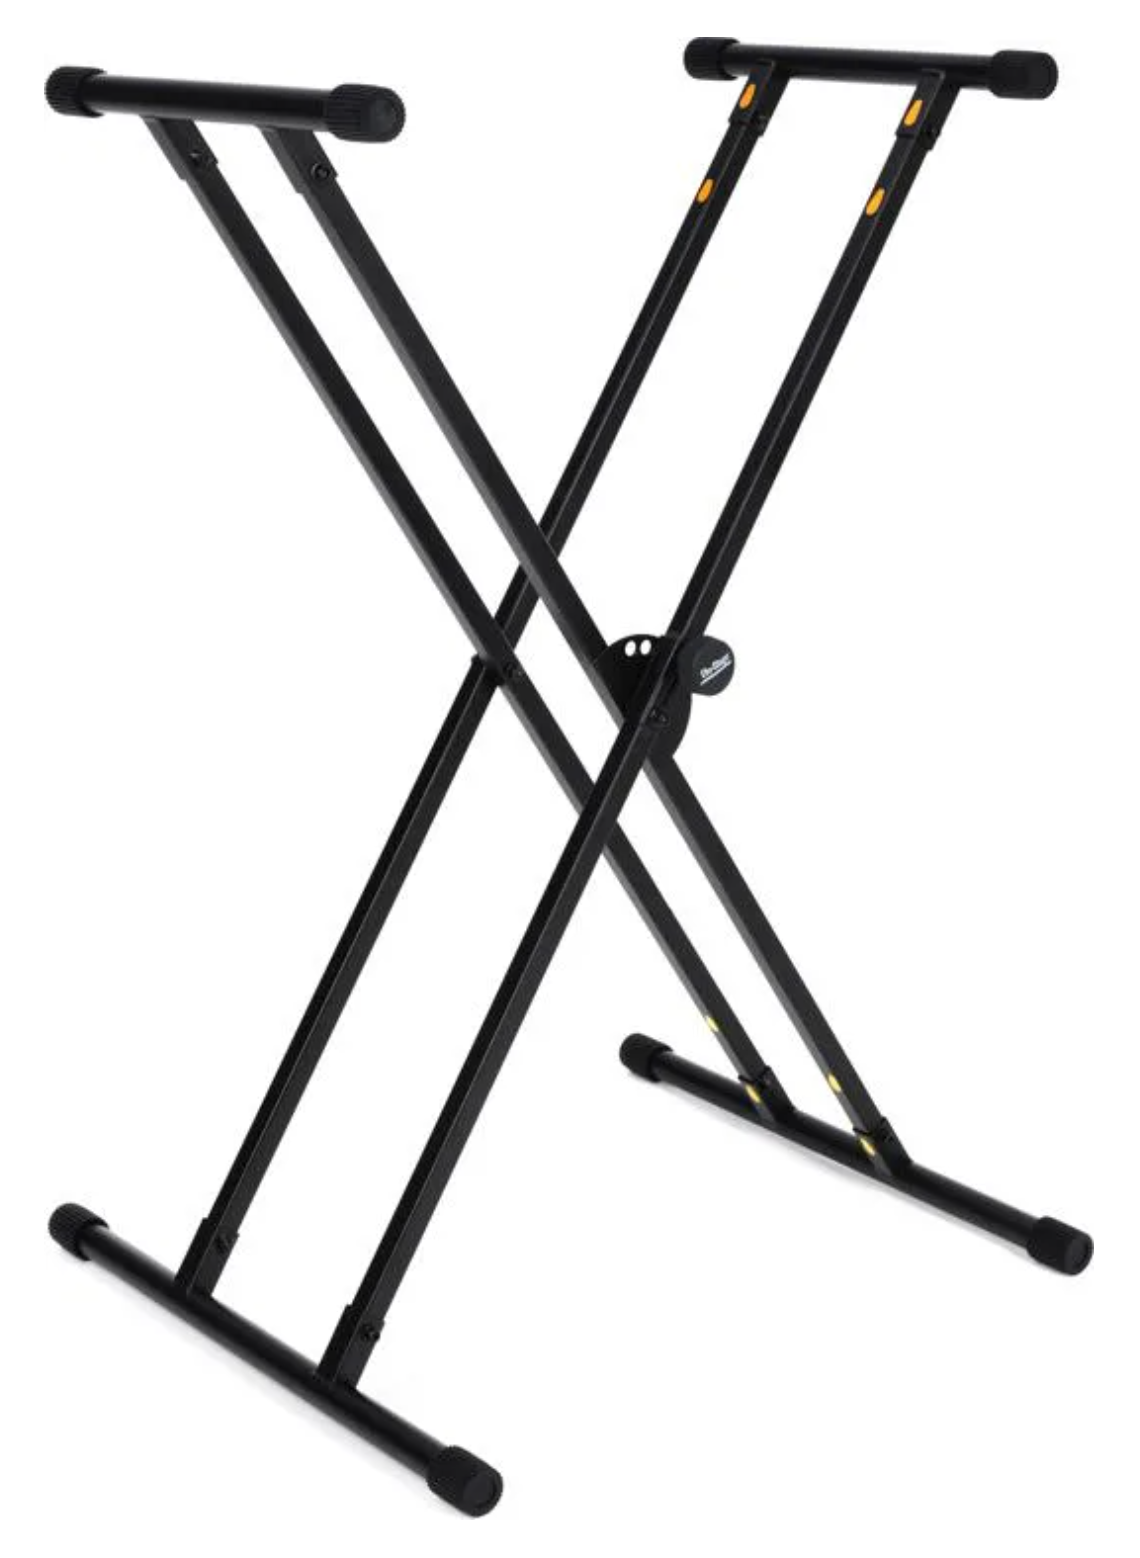
Many years ago, when I purchased my first Musical Instrument Digital Interface (MIDI) controller keyboard, I also purchased a reasonably priced, sturdy keyboard stand. I could have purchased something less expensive, but the On-Stage KS8191 Bullet Nose Keyboard Stand pictured below, has double legs making it much more stable than the single leg types. Due to the stands stability and the fact that I already owned it, made it the central piece for the solution that was brewing in my head.
I was thinking of ways to not only put my MIDI controller on the stand, but also how to place a laptop on it for running a digital audio workstation (DAW, a software application), mount an audio interface to connect my electric guitars or microphones to the laptop, and also some studio reference monitors (speakers).
Step 1: Add A Shelf Board To The Stand
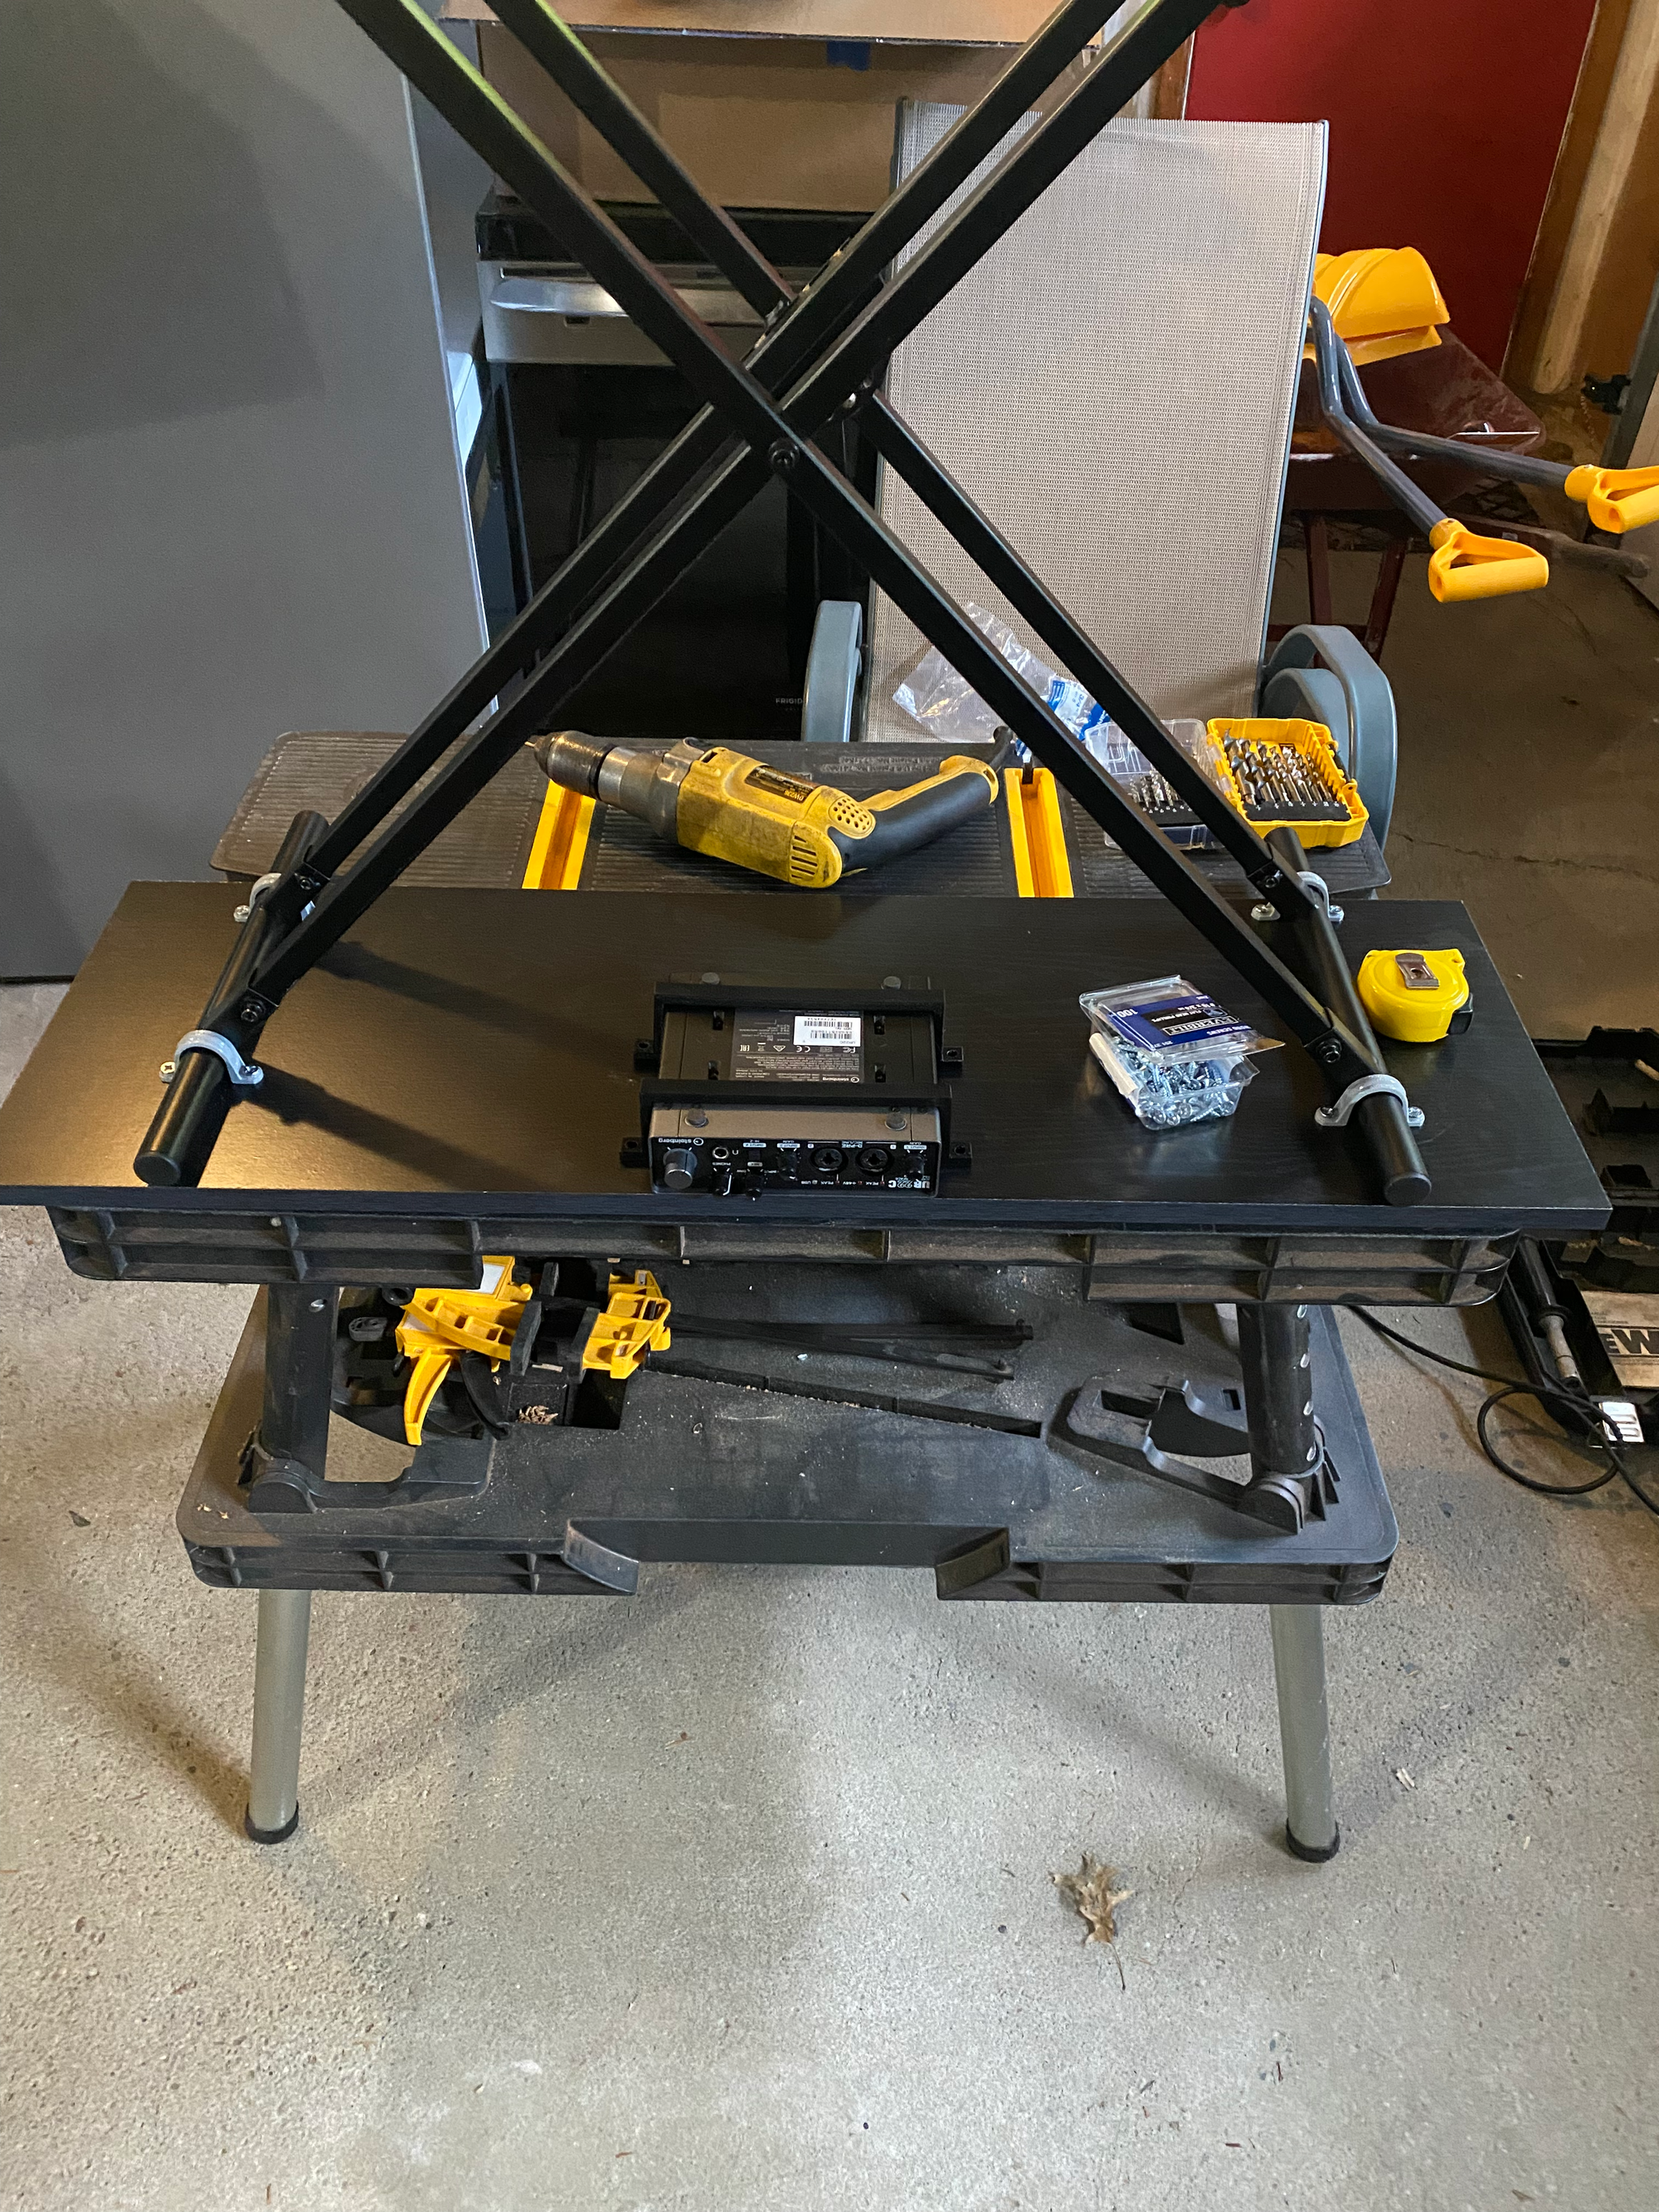
In order to secure something other than a keyboard/MIDI controller to the keyboard stand, I would need more than just the stand, and the first thing that popped into my head was a simple shelf board. I pictured securing it to the top arms of the stand using some simple conduit clamps. The nice thing is that both the shelf board and the conduit clamps could simply be purchased at the local hardware store.
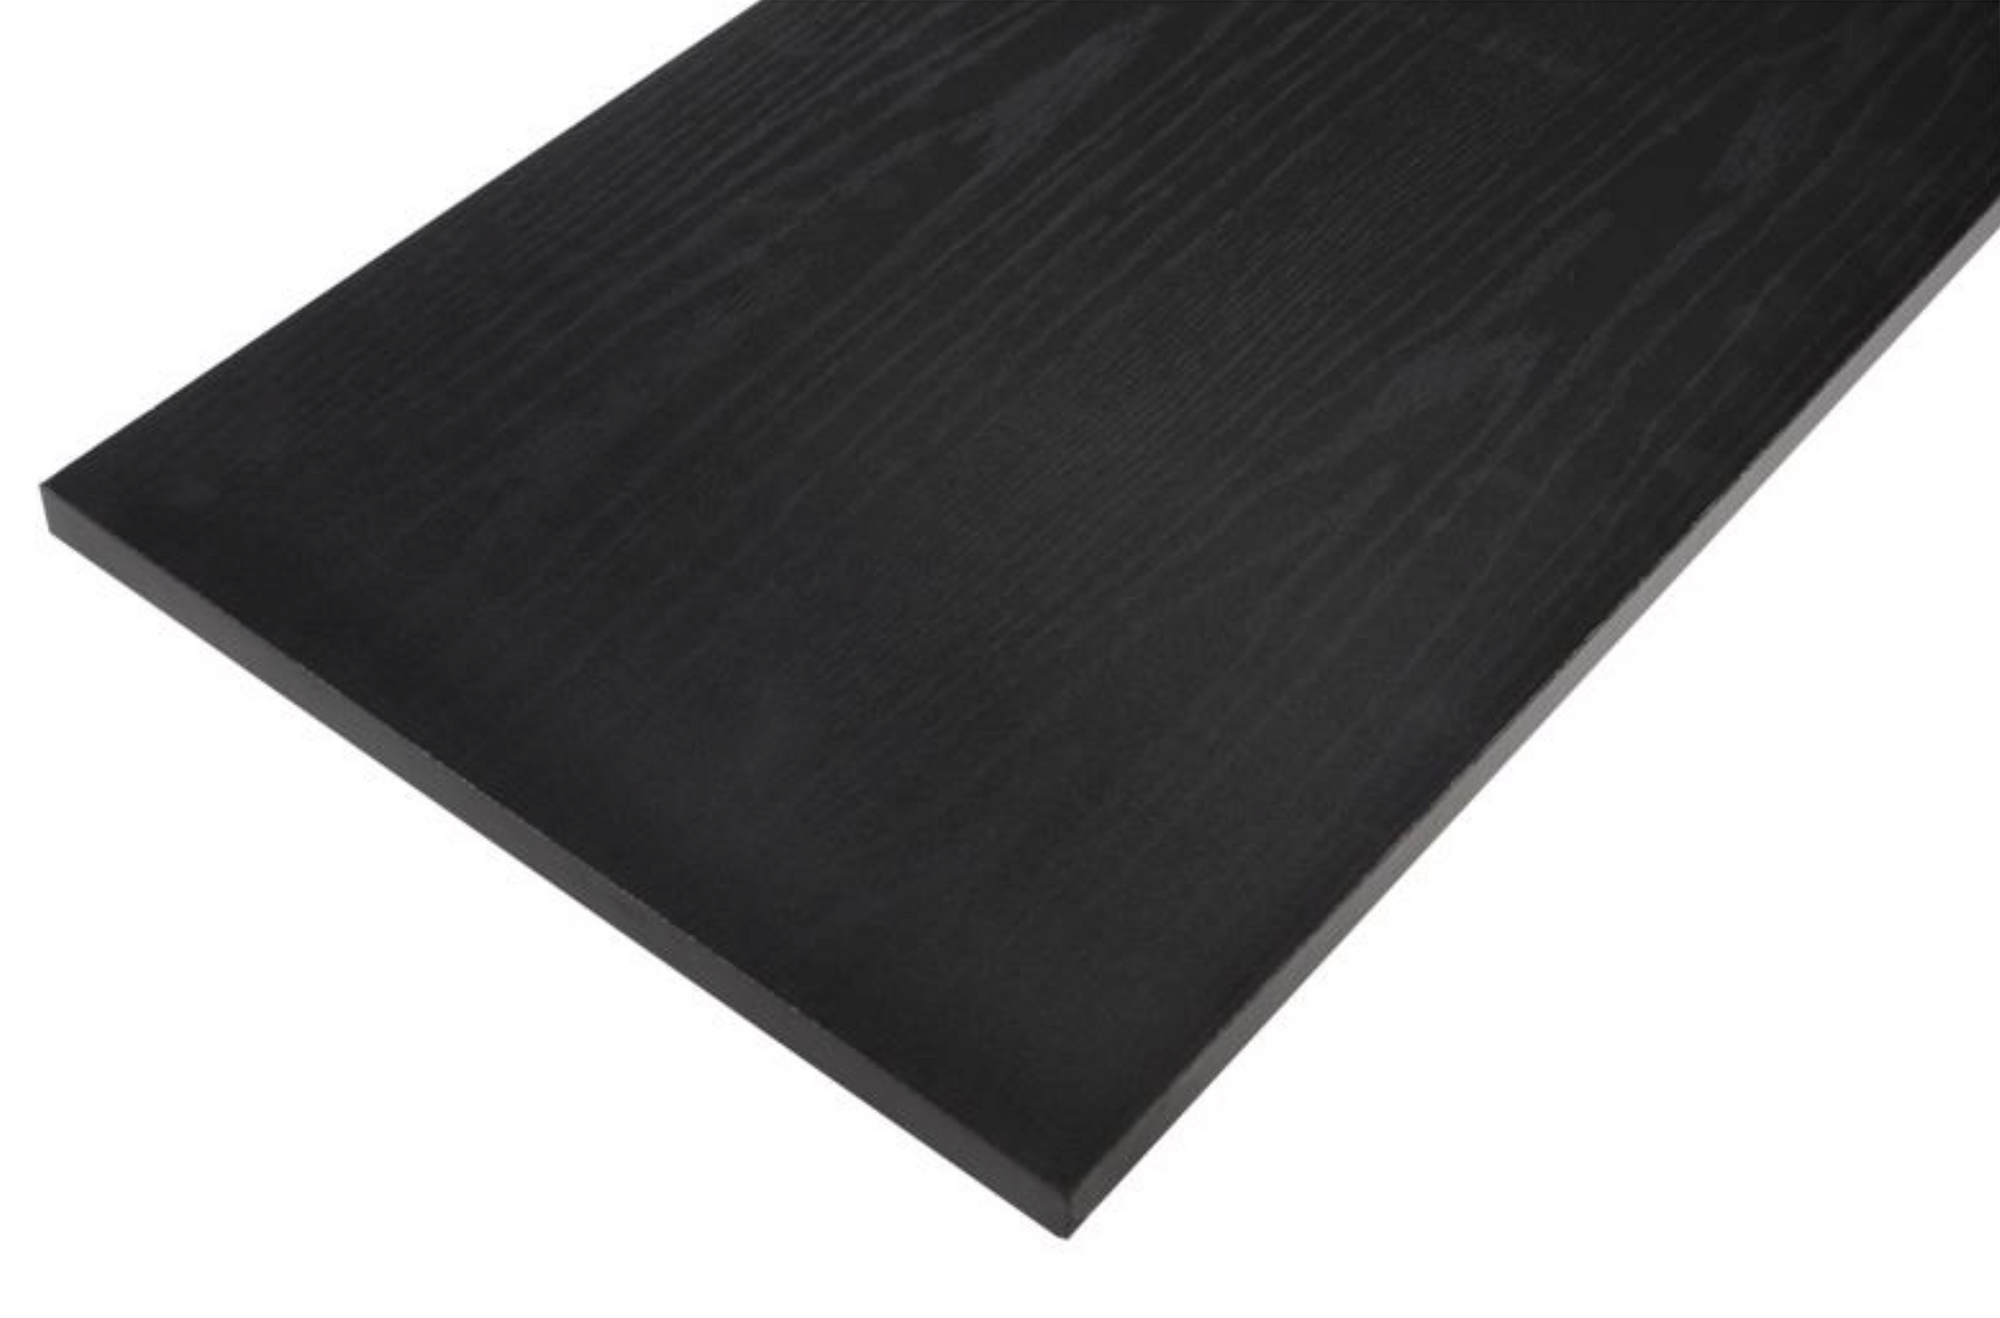
I went to The Home Depot and picked up a Rubbermaid black laminated wooden shelf board measuring 12 inches wide x 36 inches long (Model# FG4B8000BLA), and a bag of five 3/4 inch PVC conduit clamps made by Carlon (Part # E977EC-CTN).
I could have used almost any size board, so long as it was long enough to span the distance across the top arms of the keyboard stand, which is also adjustable to several different dimensions. But I specifically picked the 12 inch x 36 inch shelf board because it was very close to the size of my MIDI controller, the Arturia KEYLAB 61 MKII. Depending on the size of your keyboard/MIDI controller, you may decide on a different size board. Also, the board doesn't have to be a shelf board, and it could be from a repurposed piece of wood.
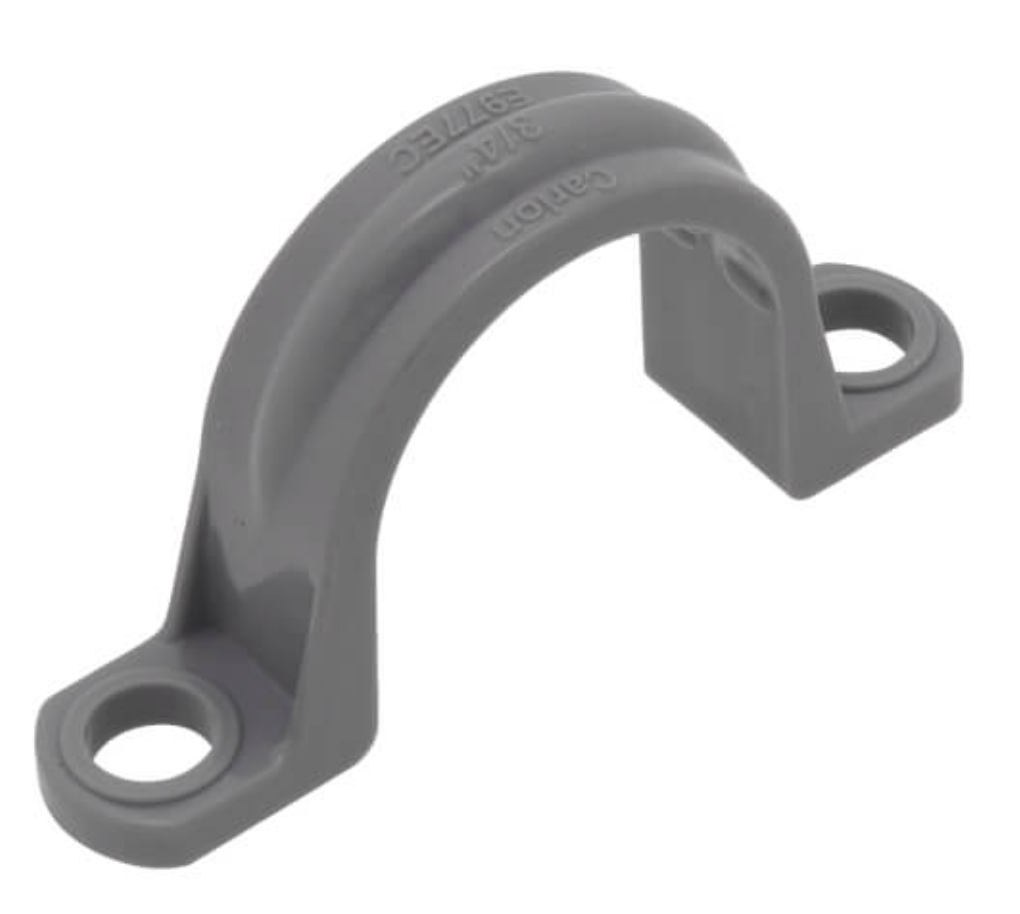
The PVC conduit clamps were an ideal "off the shelf" solution since 3/4 inch electrical conduits have an outer diameter of just under 1 inch, and the outer diameter of the keyboard stand tubes are just about 25mm, or also slightly less than 1 inch.
Step 2: Mount The Audio Interface To The Shelf Board
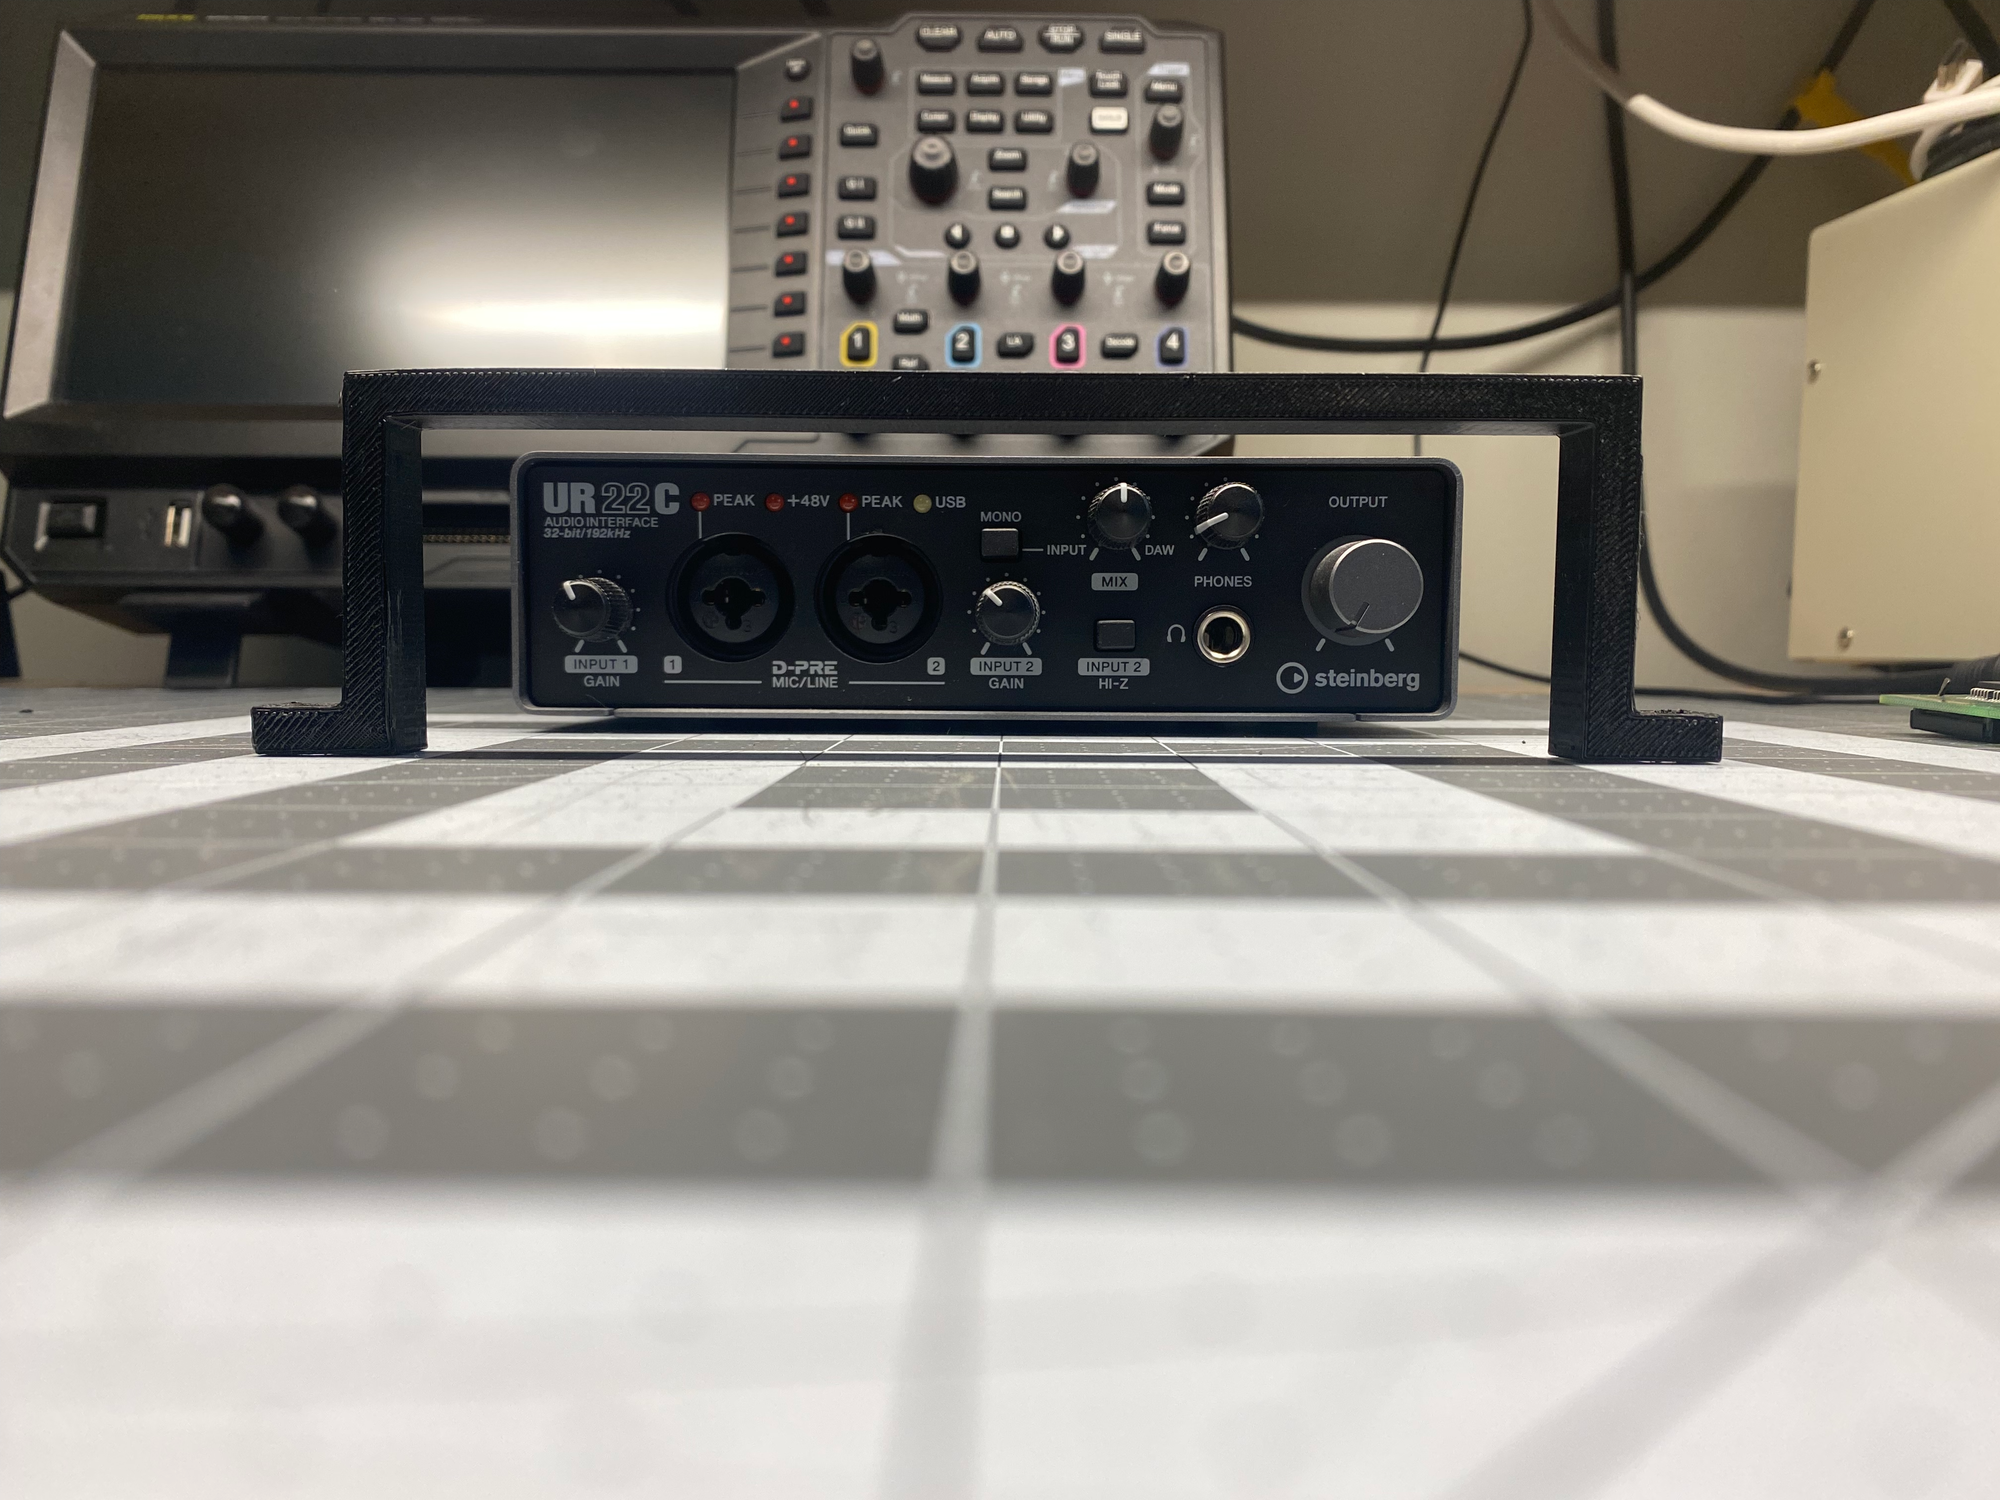
Still imagining how all of this will go together, and being the proud owner of a 3D printer, I designed some simple brackets to mount my audio interface onto the bottom of the shelf board. I designed the mounting bracket model in FreeCAD as a parametric model, which means that I designed the bracket model in a way that the model's dimensions could be changed by simply entering a few parameters. This is a handy thing to do with commonly used parts like mounting brackets, and I will prove that later in this post.
Once the parametric mounting bracket model was designed in FreeCAD, I set the length and height to the dimensions of my Steinberg UR22C audio interface, exported an STL file of the bracket, opened the STL file in my slicer application, Ultimaker Cura, duplicated the bracket on the virtual build plate, and then printed two copies of the bracket on my 3D printer. STL files are very common, I might go as far to say almost a standard in rapid prototyping, 3D printing, and computer aided manufacturing (CAM).
Even if you don't have a 3D printer of your own, you can hire someone with a 3D printer to print custom parts for you. The parts can be free models designed by others for you to download, or you can design your own parts and send them out for someone else to print. There are so many sites dedicated to downloadable 3D models. Two very popular web sites for downloadable 3D models are Thingiverse, & GrabCAD.
After removing the rubber grips from the top arms of the keyboard stand, and then using some 3/4 inch #10 wood screws, I secured the top arms of the keyboard stand to the bottom of the shelf board, and also mounted the UR22C audio interface using the 3D printed mounting brackets.
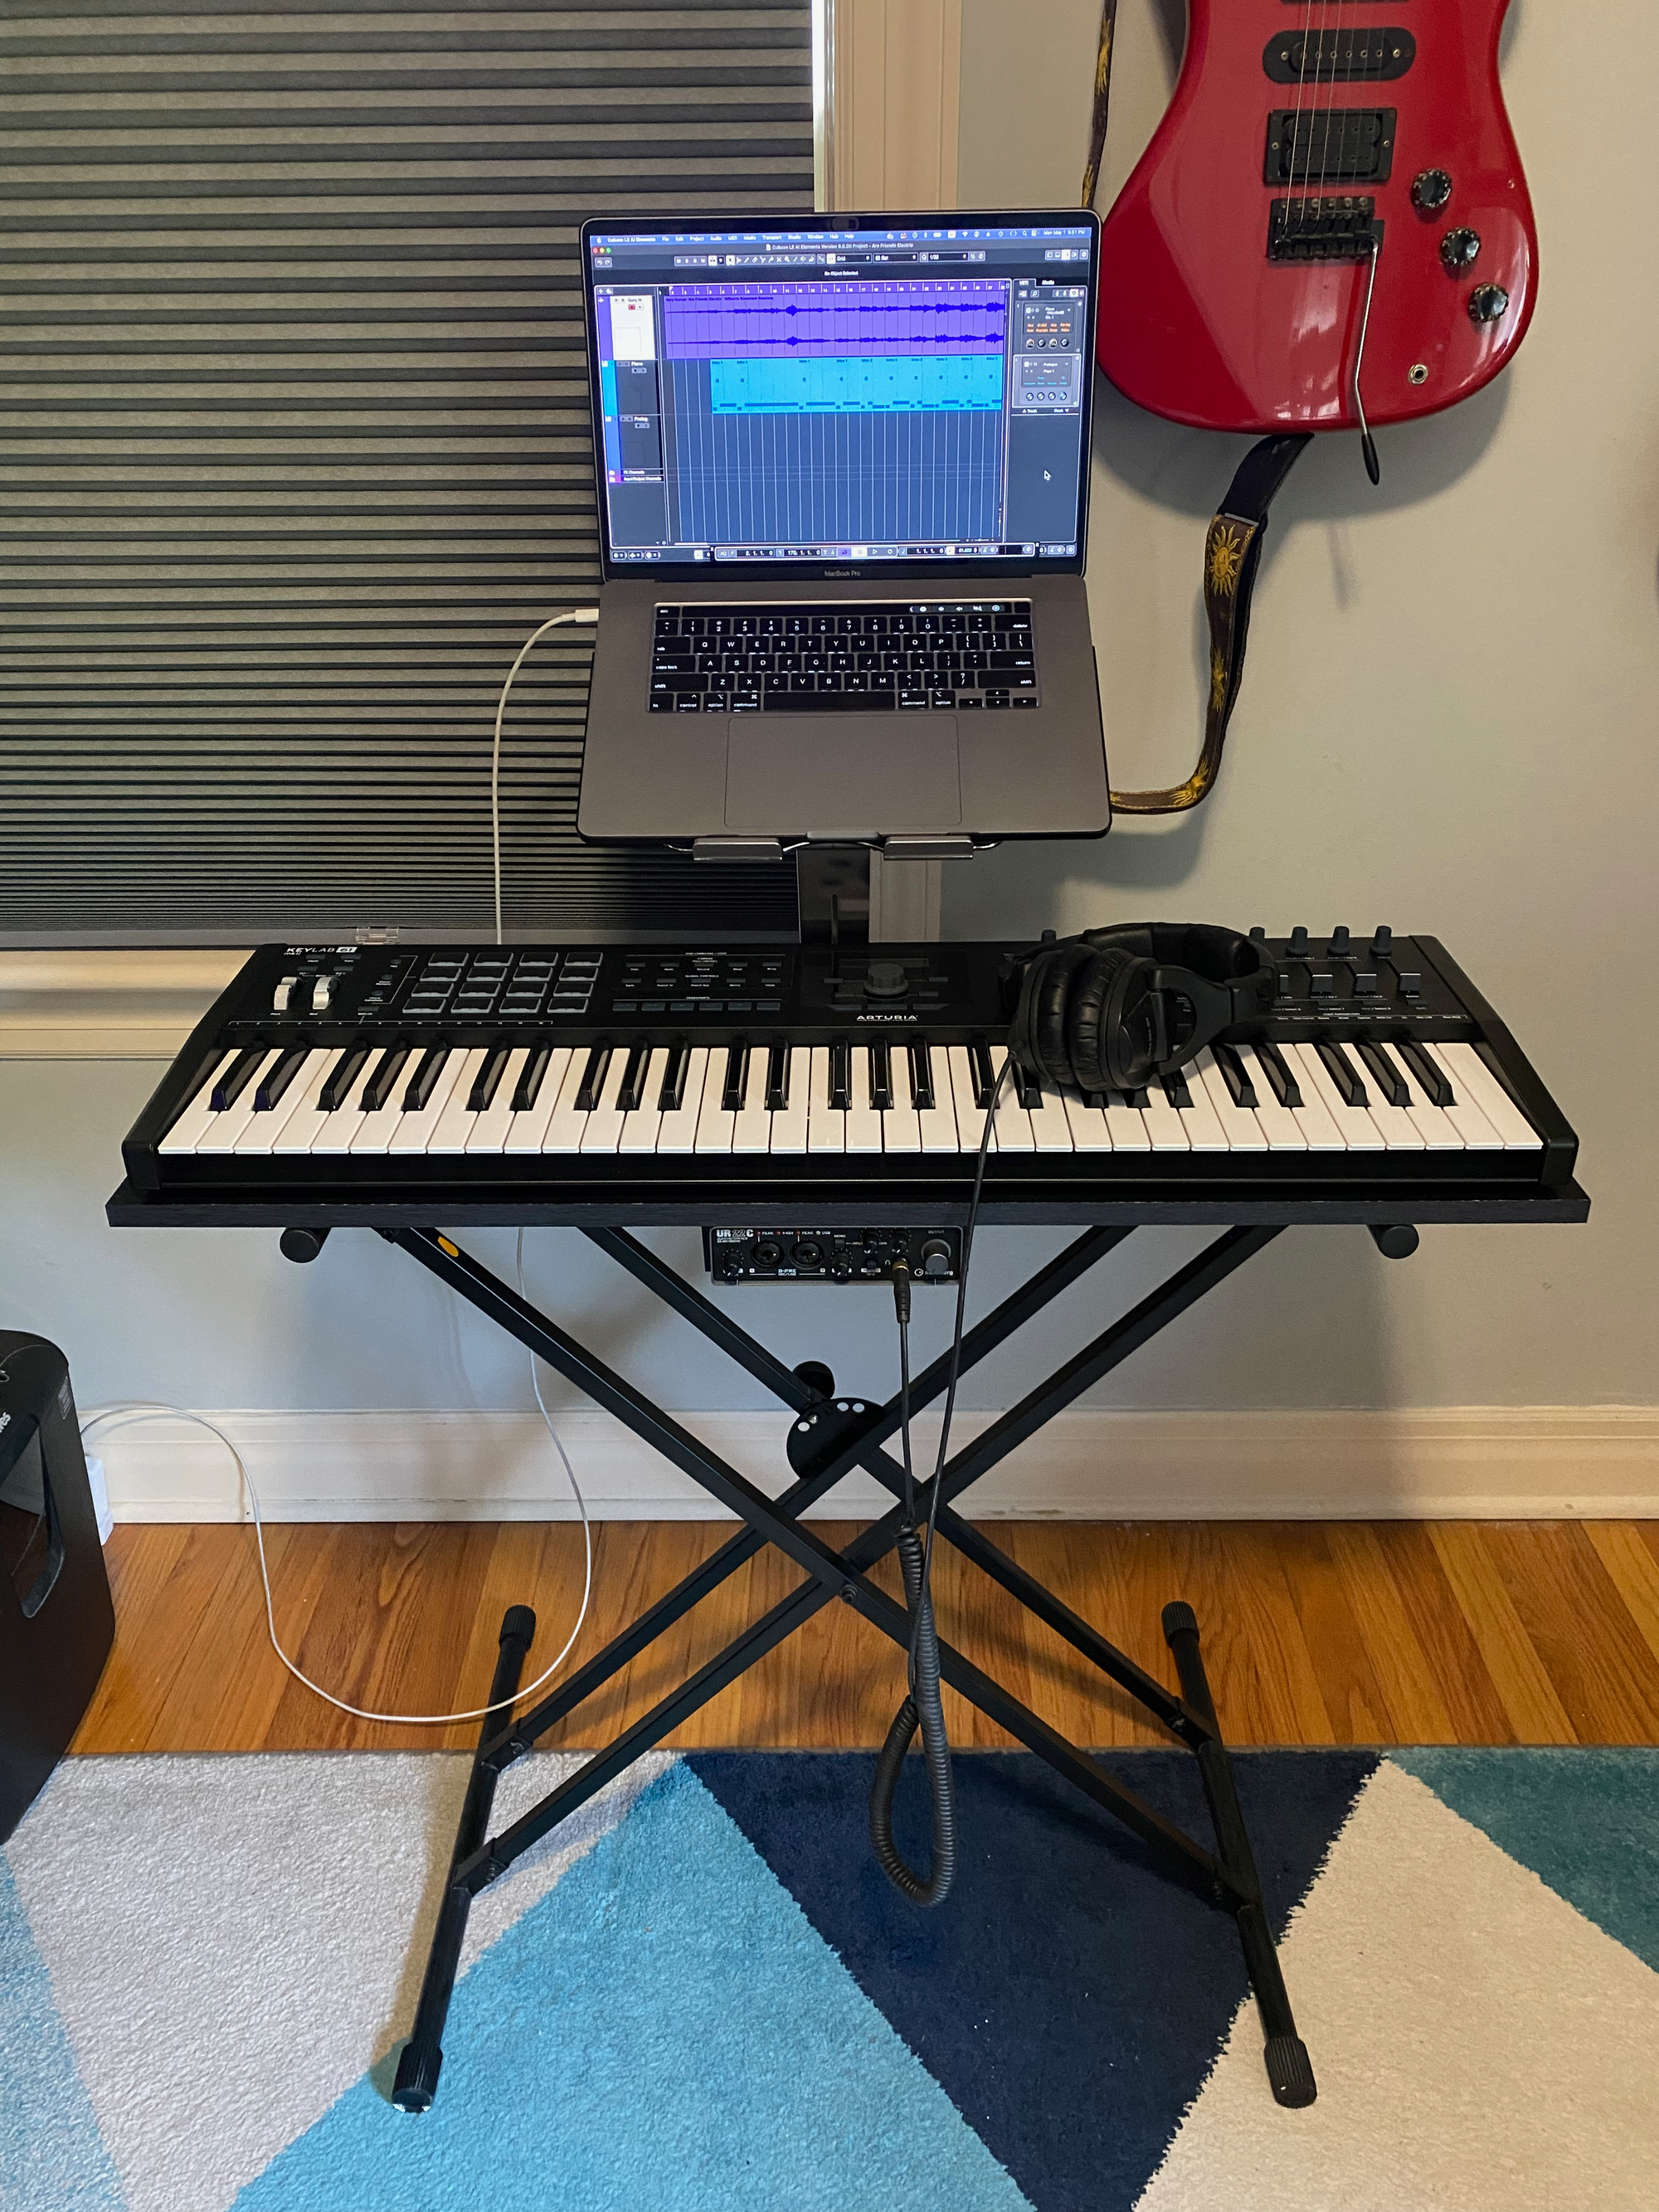
First Trial Setup
Once the audio interface and the keyboard stand were joined to the board, I found a new use for an adjustable & ergonomic laptop stand that I had purchased almost two years prior on Amazon, and hadn't had a need for in about as long, until now!
Prelude To Step 3:
Soon after getting Steps 1 & 2 of this build completed, it was time to put the minimalist recording studio to the test when my brother-in-law came to visit. We ran a guitar cord between my electric bass and the UR22C audio interface to record a new bass track. Audio monitoring of the mixdown of the pre-recorded tracks and his live bass performance was through Sennheiser HD-280 Pro Monitoring Headphones, a favorite of mine for almost three decades. The recording and mixing was all being done in Cubase Elements, the DAW running on my MacBook Pro laptop. We didn't even need a bass amp, since it's included in Cubase Elements as a virtual studio technology (VST) plugin!
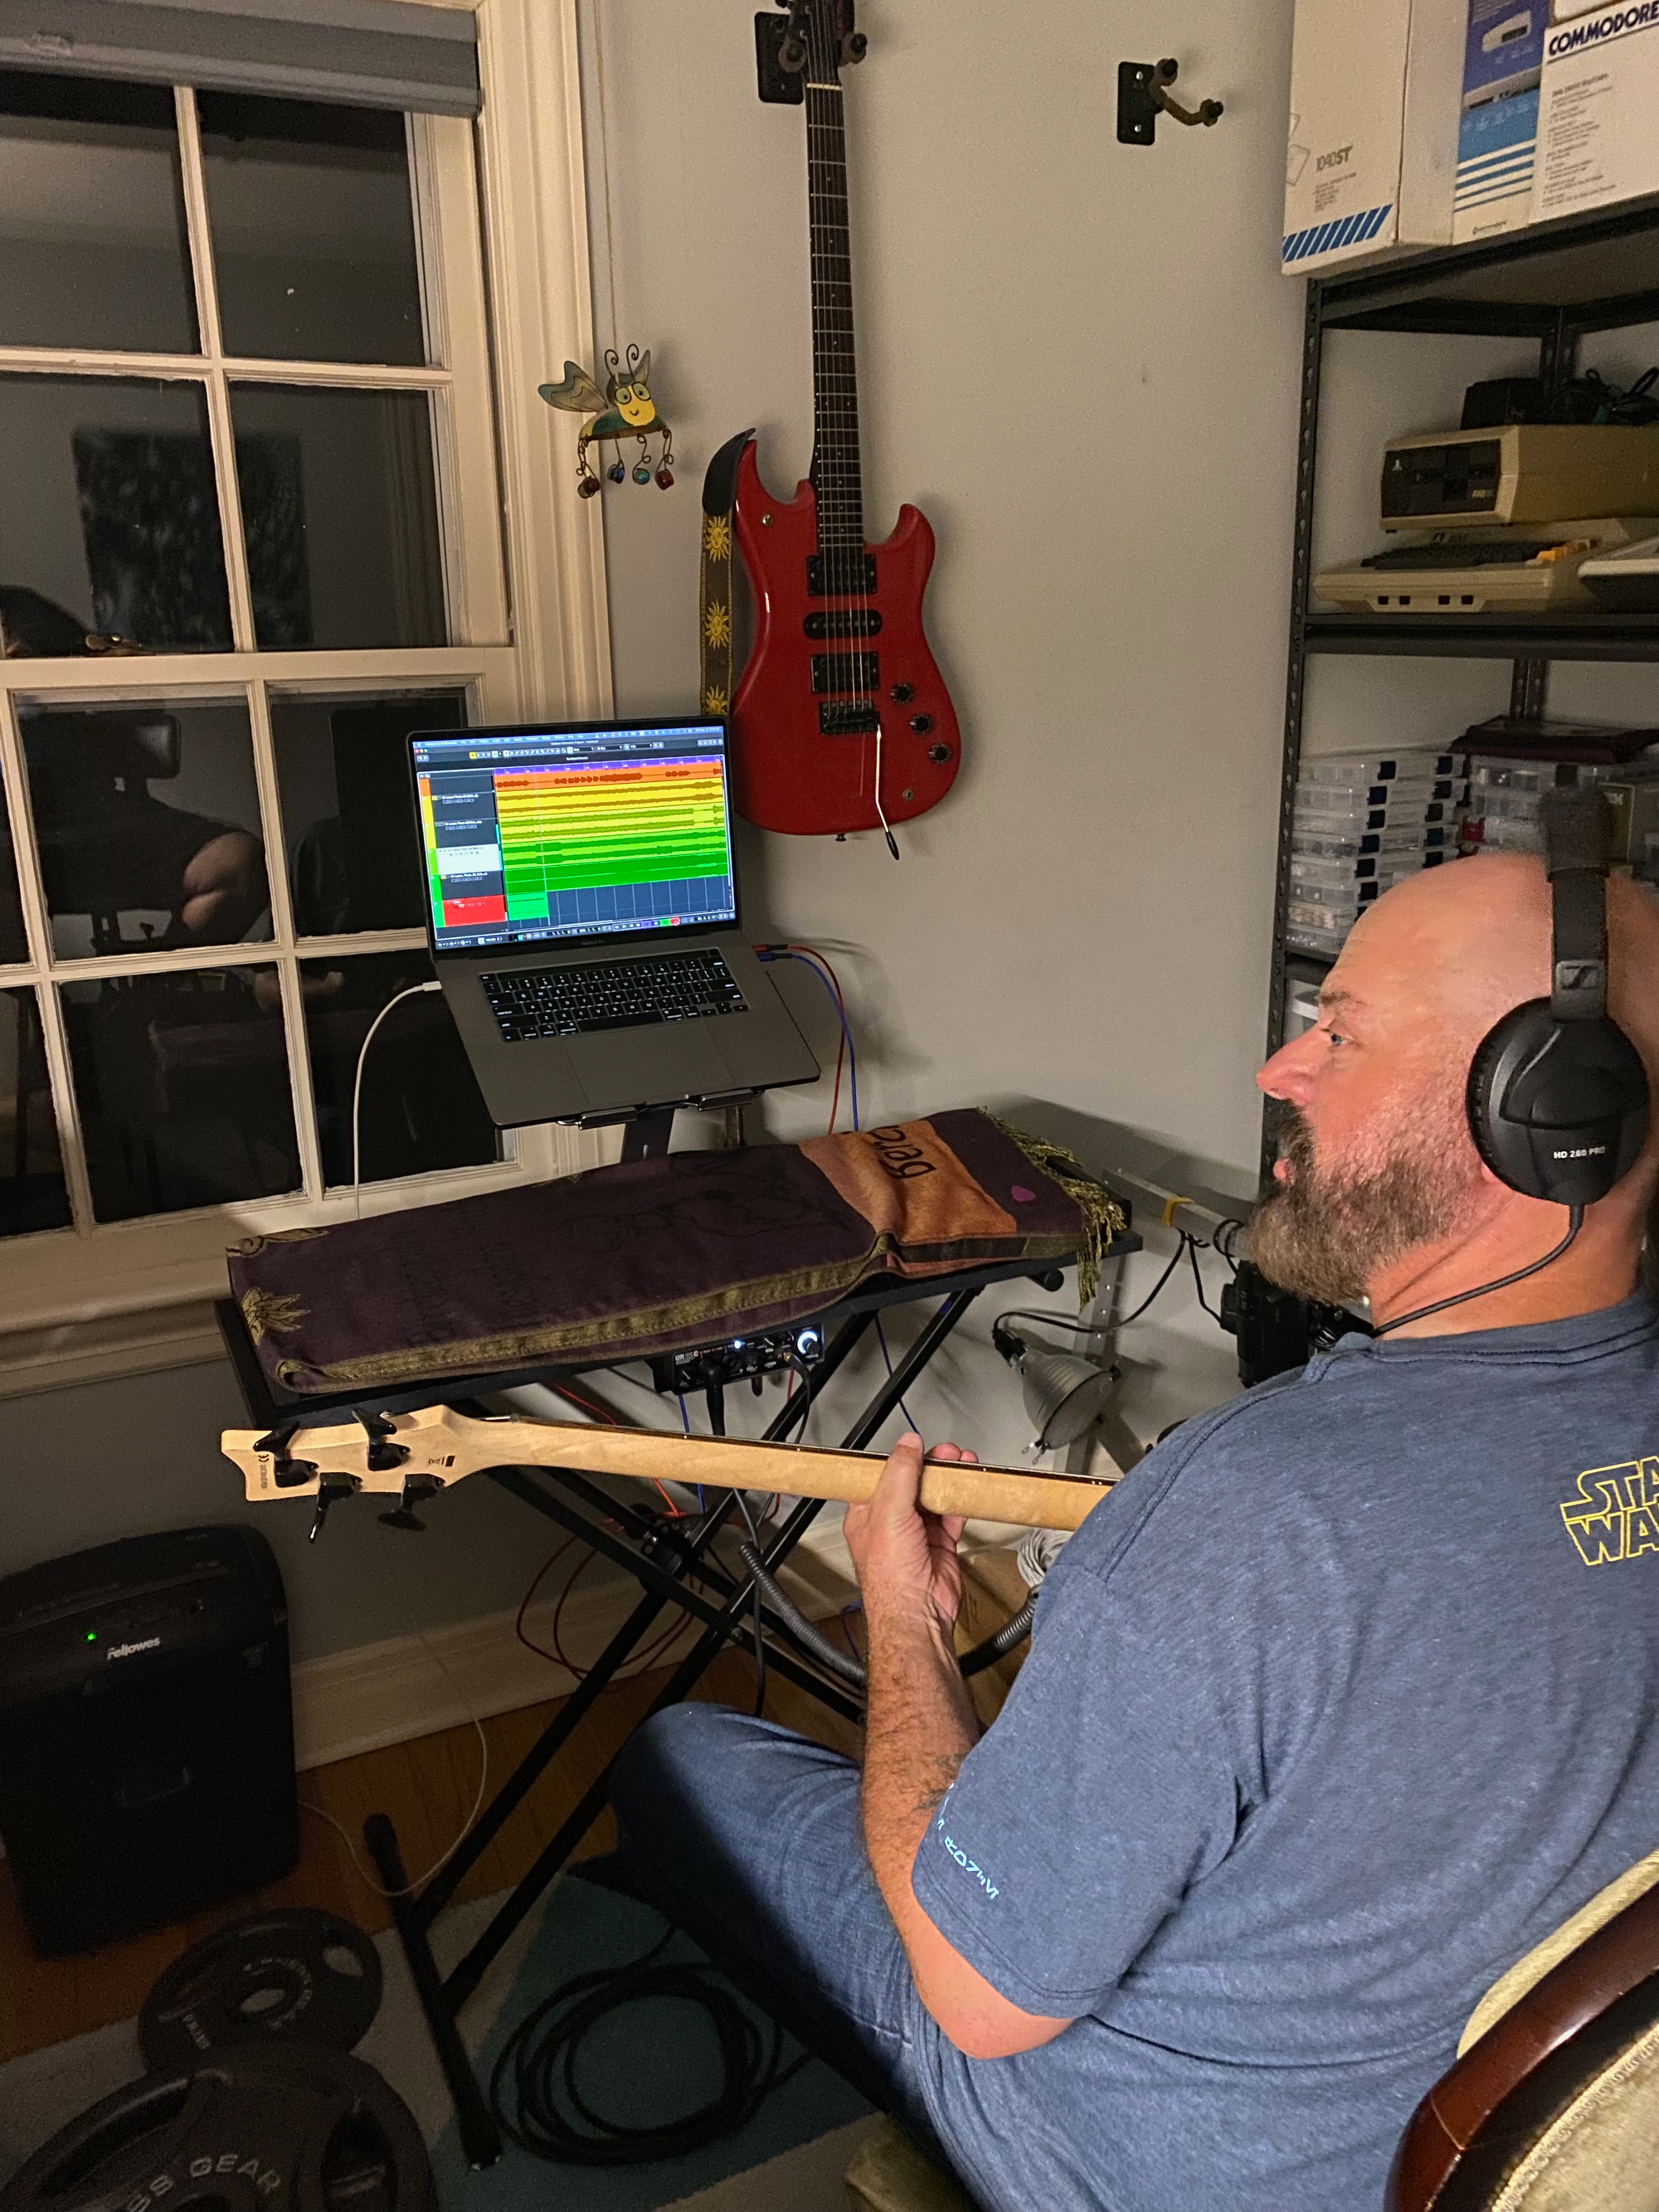
We had a lot of fun that night, but I immediately wished that I had my Sennheiser FreePORT wireless guitar rig connected along with my M-Audio BX-5 studio reference monitors so we could both listen to the mix. The gears in my skull were spinning, and since I had a challenging generator set troubleshooting job to prepare for out of town the following week, it gave me time to process how I would implement the next step of construction.
Two weeks after Joe's visit, my cousin came over to do some recording and jamming. I temporarily set up the FreePORT wireless unit on top of the right BX-5 monitor, with both of the BX-5 reference monitors sitting on top of the boxes that they were packaged in.
Ideally, the reference monitors should be at ear level, to the left and the right of the laptop. I had the last week or so to think of a solution that centered on a shelf to place the BX-5 monitors and my laptop on top of. The BX-5 studio reference monitors have some weight to them, so my shelf brackets would need to be pretty sturdy to support both of the monitors and the laptop.
Step 3: The Monitor & Laptop Shelf
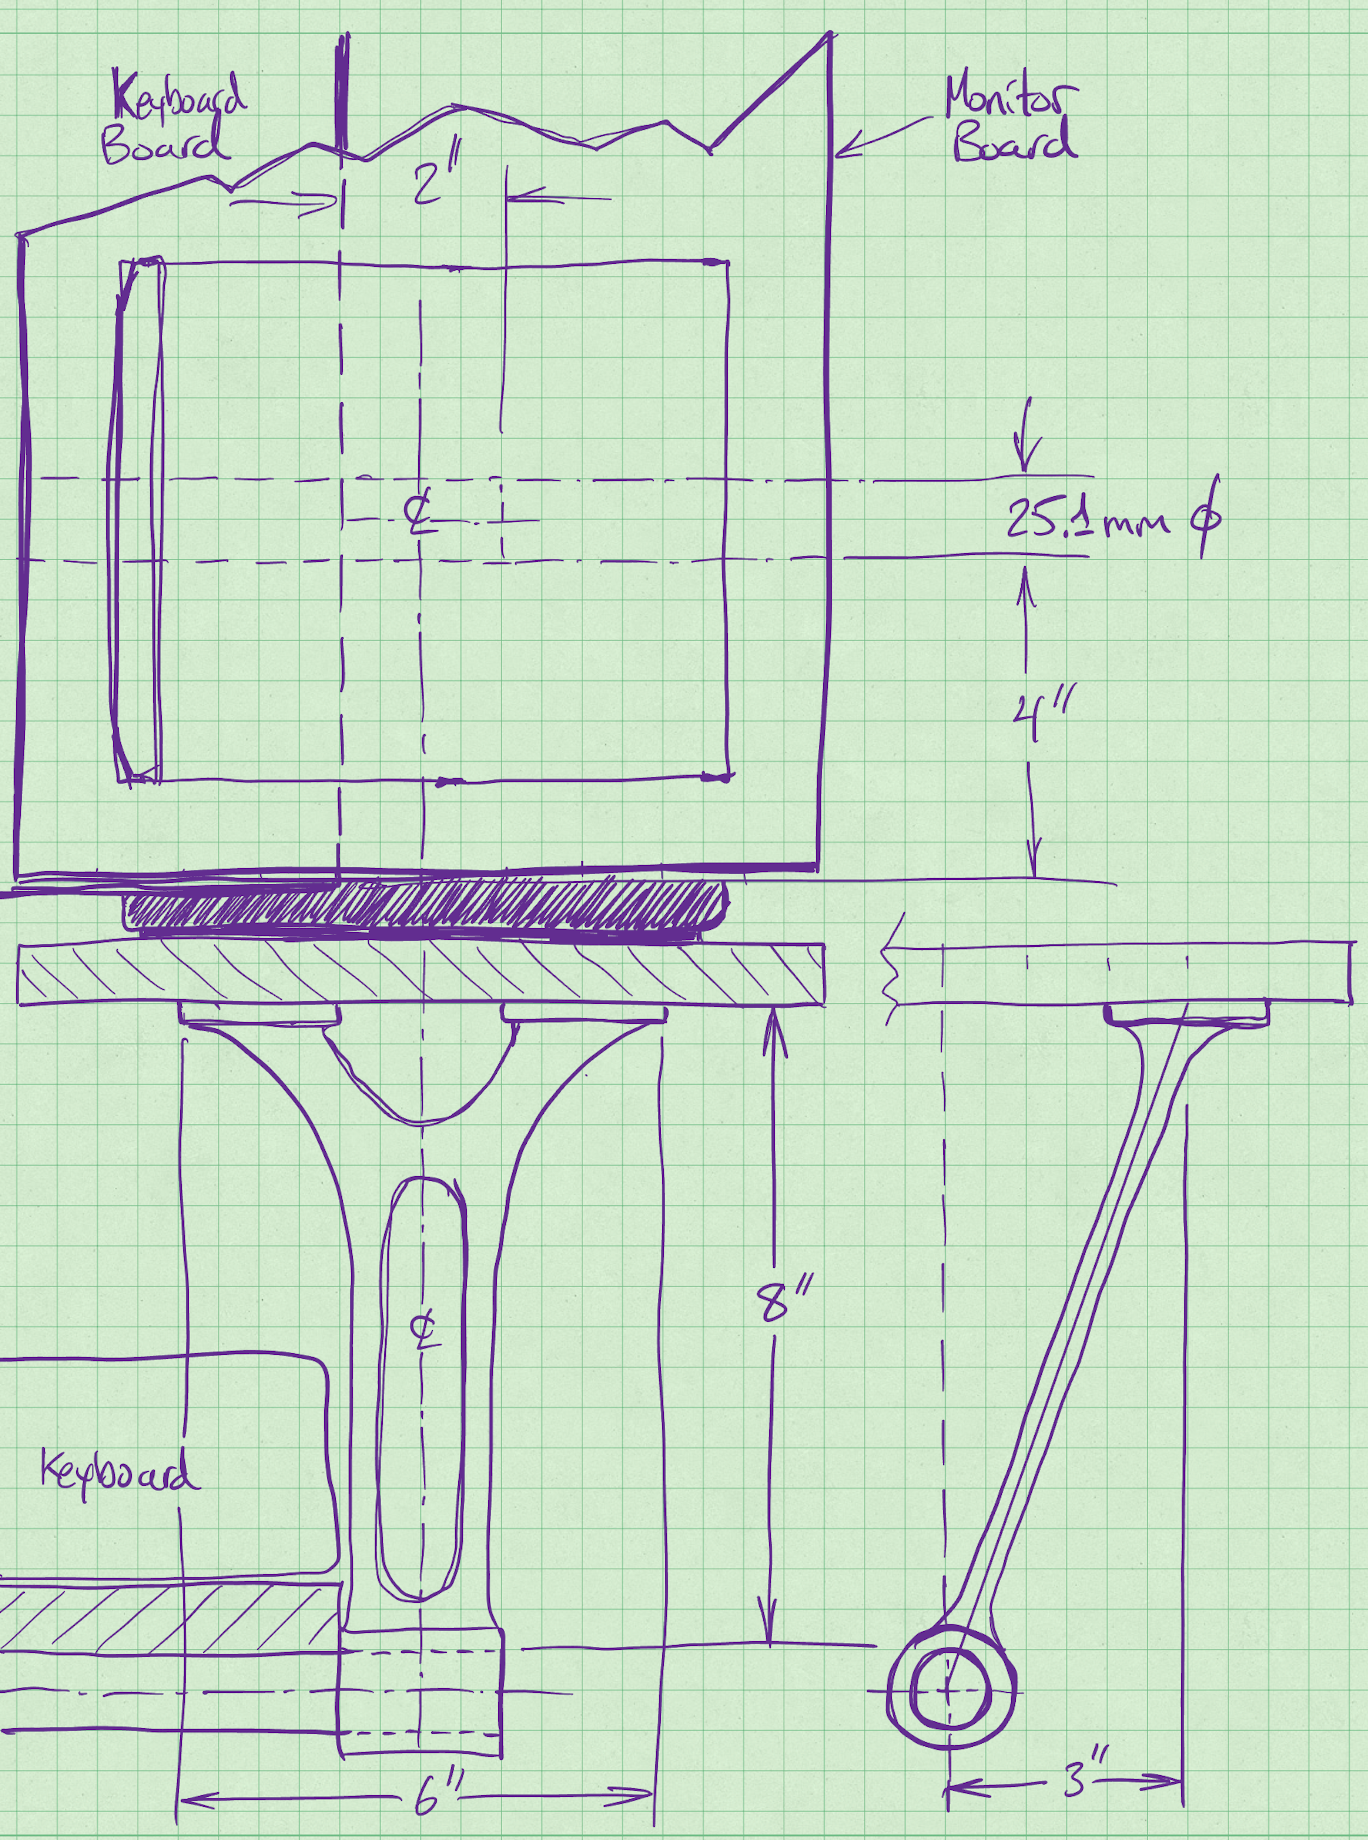
The top arms of the keyboard stand are two inches longer than the width of the shelf board that the MIDI controller is resting on, so they stick out from the back side of the shelf board by two inches. This wasn't initially planned to have a use, it just turned out that way, and now turned out to be serendipitous (say that three times quickly 🤣). One morning I took some measurements of the setup, and guessed at the minimum height for the new shelf from the top of the MIDI controller knobs and sliders. I wanted to make sure to have enough room for my hands to comfortably access the knobs and sliders, and also to clearly see the LCD display.
After getting some general measurements, I hand sketched a design for the shelf brackets that would slip over the ends of the keyboard stand upper arm tubing and screw onto the shelf board.
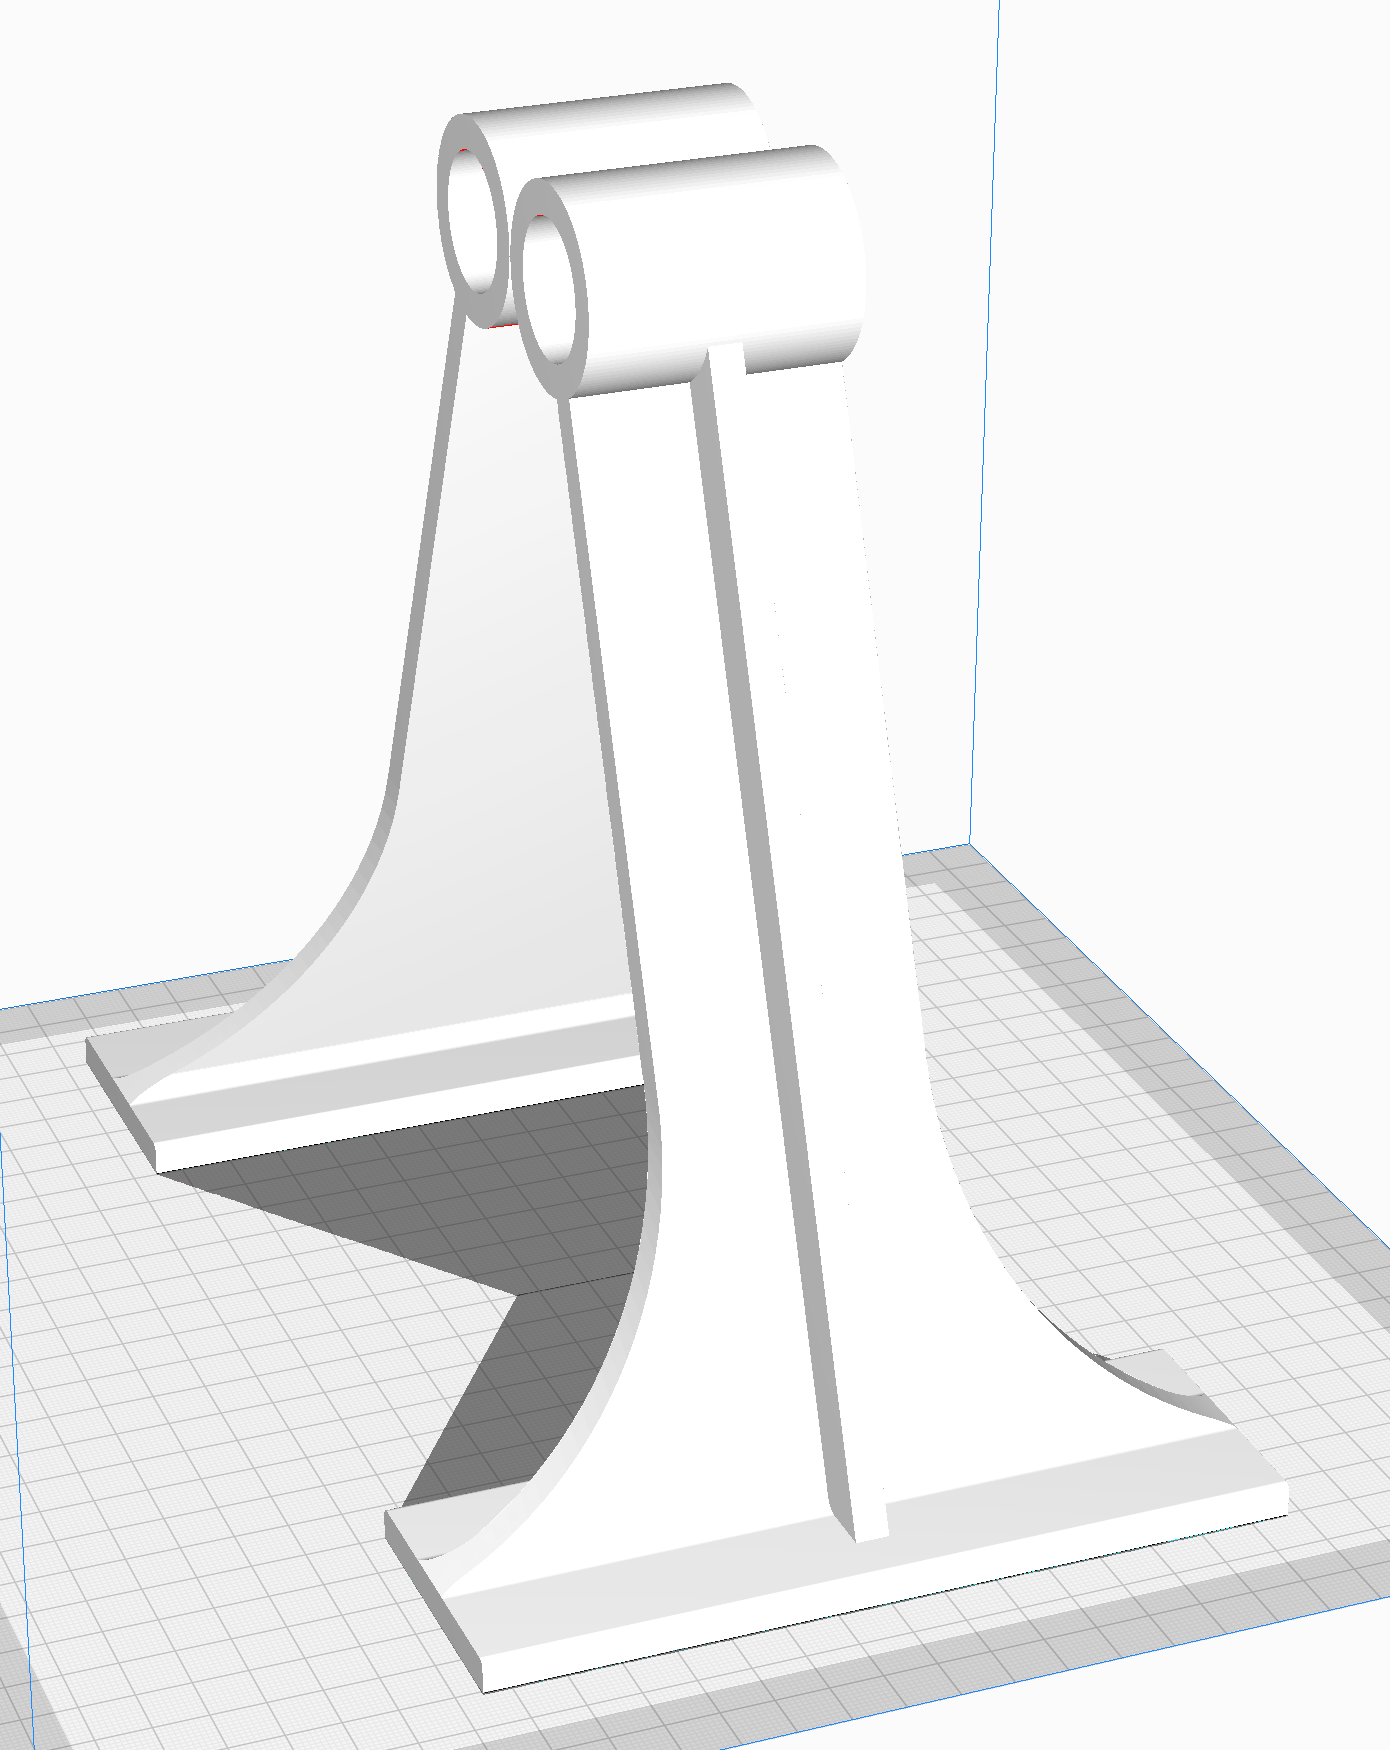
Soon after making my concept sketch, I went into FreeCAD and made a 3D model that I could print on my 3D printer. I never incorporated the cut-outs from the concept sketch, and instead opted to keep it solid. I also opted to add a stiffener going the height of the bracket on the outboard side. You can see the differences between the sketch and the screenshot below:
With a model in FreeCAD, I only needed to export an STL file and open that in my slicer application, Ultimaker Cura. The print took about six and a half hours. I drilled mounting holes into the printed brackets and screwed them to a new piece of shelf board, also by Rubbermaid (Model# 4B2500BLA), this board measures 36 inches long x 10 inches wide, the same length as the main board, but not as wide. This width was ideal for the MacBook Pro and also plenty of room for placement of the BX-5 monitors.
As soon as I mounted the new shelf, it was clear that I did not design the brackets to be rigid enough for the way they mount, nor for the weight they would need to support. The shelf was much too wobbly with or without any weight on it.
Step 3.5: Add Gussets To The Shelf Brackets
Once I saw how flimsy the bracket arms were, it was clear that a complete redesign or modification of the bracket design was needed. I went with the latter, and built upon the existing design by adding what is know as a gusset to the shelf bracket model.
Mechanical structures like bridges, buildings, and towers typically have gussets in the areas of the structure where two or more structural members meet. Gussets provide for additional area to make the connections between the parts, and they also provide a way to help carry or distribute the loading of the structure. In real world structures, engineers perform calculations to determine the loads on each joint/connection of a structure. But in this application, I didn't make any calculations, I just empirically designed a gusset in FreeCAD as a separate part and 3D printed two of them to be glued onto the existing shelf brackets.
Once the gussets were printed, I drilled two mounting holes in each of them, and then glued them to the brackets with cyanoacrylate glue, A.K.A. "super glue", which works really well on polylactic acid (PLA), the material that was used to print the parts. As soon as the now reinforced brackets were done bonding with the gussets, I added the two additional 3/4 inch wood screws to each of the gusset's base plates and WOW, what a difference in rigidity!
Step 4: Mount The Sennheiser FreePORT Wireless Unit
At the beginning of Step 2 of this post I stated that the parametric model of the mounting bracket for the UR22C audio interface would be useful again, and now is that time. The model was made to include a spreadsheet that allows one to enter certain dimensions, and those dimensions then instantly get applied to the model. On the first pass, when preparing the brackets for the UR22C audio interface, I entered a length of 159mm and a height of 47mm. Now for the Sennheiser FreePORT wireless unit, I simply changed the length to 214mm and the height to 30mm, exported a new STL file, loaded that new STL file into Ultimaker Cura, and printed two of them on my 3D printer.
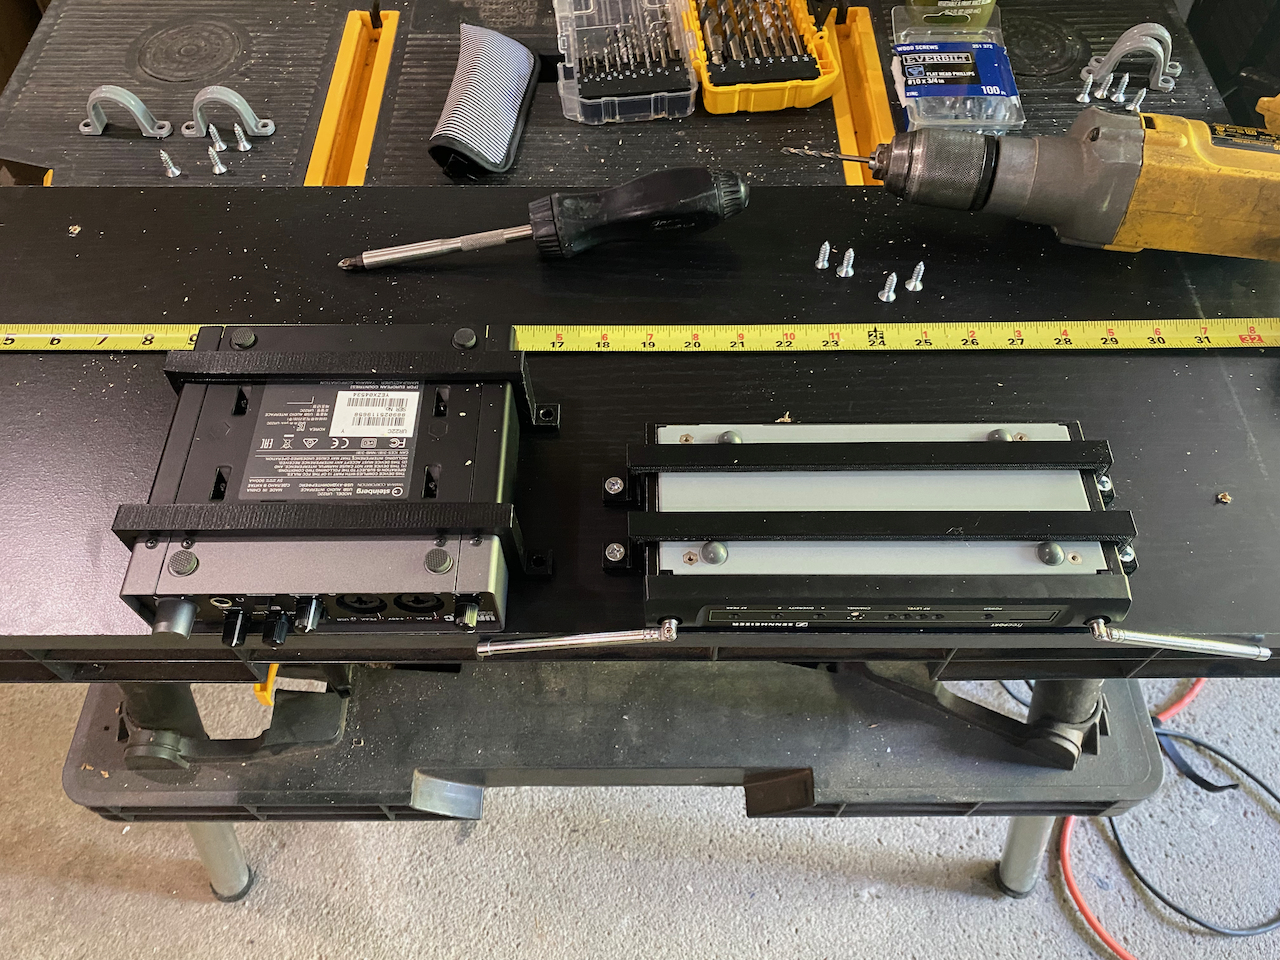
With the newly sized brackets printed from essentially the same 3D model in FreeCAD, I completely disassembled everything so that I could reposition the UR22C to make room for the Sennheiser FreePORT.
Step 5: Add Cable Ducts For Cable Organization
Pleased with where the build was so far, and not in immediate need of any additions, I felt the setup was lacking a clean way to route & hide all of the dangling cables. A quick search on Amazon resulted in a Cable Raceway Kit that comes with five sections, each 15 inches long x 1.6 inches wide x .98 inches high, perfect for my needs.

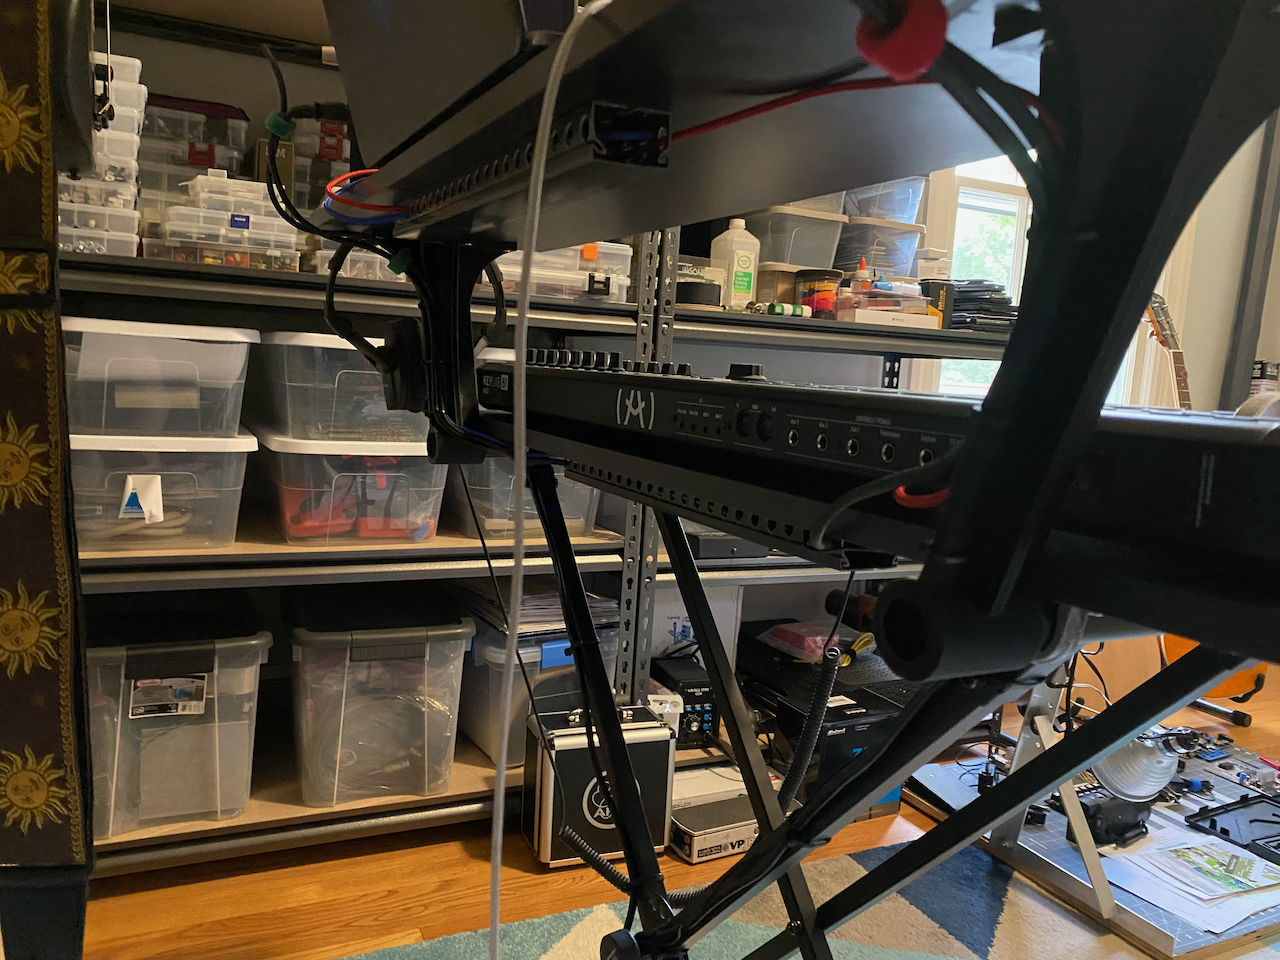
Step 6: Final Touches
Having all of the cables neatly tucked away, and a screw in hanger for my headphones are the final touches for now. I am going to work with the setup as it currently is for a while and see how it performs for what I need. I'm expecting I may make further changes and additions as time goes on.
If you have already subscribed, please feel free to share any ideas/suggestions in the comments below. If you haven't subscribed, what are you waiting for? It's free, and I will not share your email address with anyone, and you will only get emails when I publish new posts.